Author

robert

Browsing

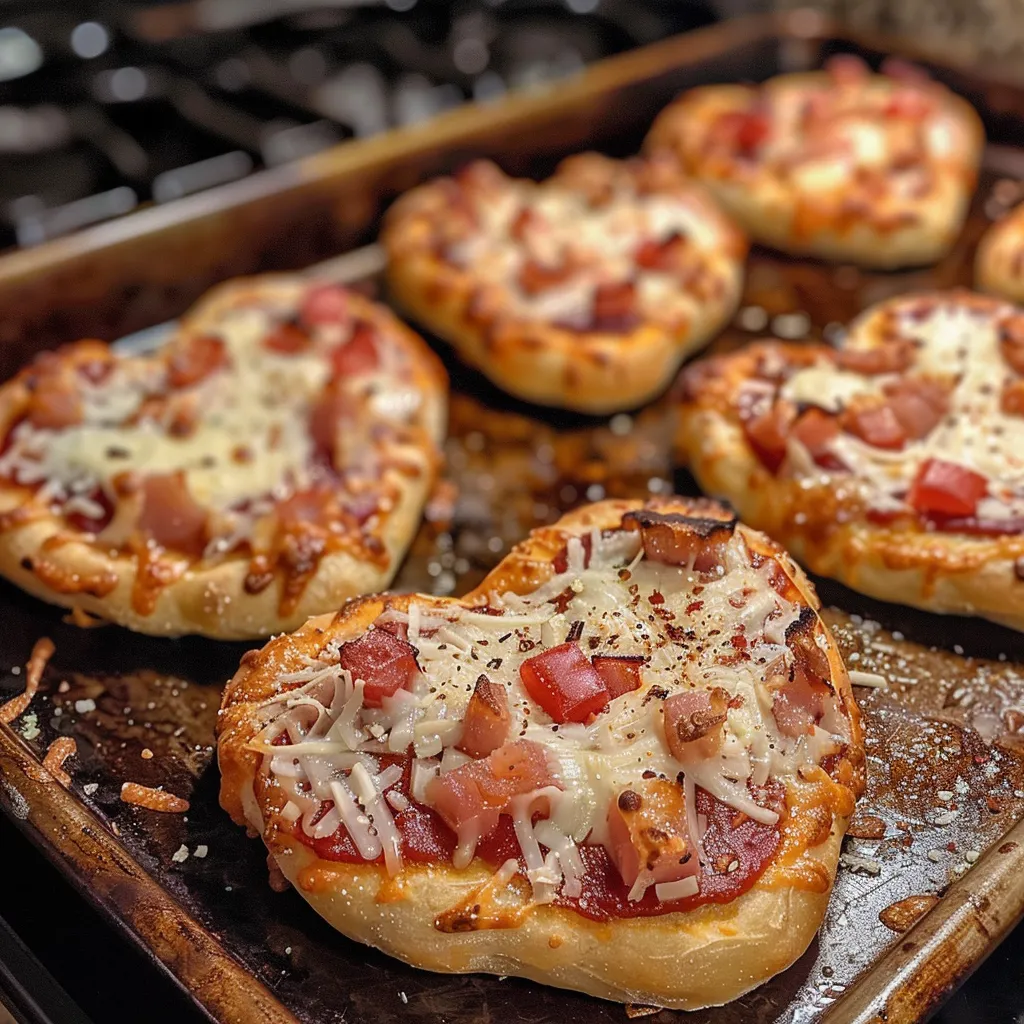
Creating Delicious Heart-Shaped Mini Pizzas: A Fun Culinary Adventure

When it comes to celebrating special occasions like Valentine’s Day, nothing says love quite like homemade food. These heart-shaped mini pizzas are not only visually appealing but also incredibly easy to make, ensuring you can whip them up without any stress. In this guide, we’ll explore how to create these delightful pizzas that are perfect for gatherings, romantic dinners, or casual family nights. With a few simple ingredients and some creative flair, you can make pizzas that are as fun to prepare as they are to eat!

Why You’ll Love This Recipe

This recipe is designed with both taste and simplicity in mind. Here are just a few reasons to fall in love with it:

  • Easy to Customize: Personalize each mini pizza with different toppings to suit everyone’s tastes. From pepperoni to fresh vegetables, the options are endless!
  • Quick Preparation: Using pre-made pizza dough means you can have these delicious bites ready in under 30 minutes, making them perfect for any occasion.
  • Fun for Everyone: Involve kids and family members in the cooking process. Shaping the dough and topping the pizzas can be a fun activity for all ages.
  • Perfect for Sharing: These bite-sized pizzas are great finger foods, making them ideal for parties, gatherings, or a cozy night in.
  • Versatile Serving Suggestions: Pair with a fresh salad or a side of garlic bread for a complete meal that’s sure to please.

Ingredient Breakdown

Let’s dive into what you’ll need to create these heart-shaped mini pizzas, along with some substitution ideas:

  • 1 pre-made pizza dough: Saves time and effort. You can also use homemade dough if you prefer.
  • 1/2 cup pizza sauce: Feel free to use store-bought or make your own for a fresher taste.
  • 1 cup shredded mozzarella cheese: The classic choice, but you can experiment with other cheeses like cheddar or a vegan alternative.
  • Assorted toppings: Options include pepperoni, bell peppers, olives, mushrooms, or any favorite ingredients. Get creative!

Step-by-Step Instructions

A collection of heart-shaped mini pizzas served on a wooden board.

Follow these simple steps to create your heart-shaped mini pizzas:

  1. Preheat your oven to 400°F (200°C).
  2. Roll out the pizza dough on a floured surface until it’s about 1/4 inch thick.
  3. Use a heart-shaped cookie cutter to cut out mini hearts from the dough.
  4. Spread pizza sauce on each heart, leaving a small border around the edges.
  5. Sprinkle shredded mozzarella cheese generously over the sauce.
  6. Add your favorite toppings on each mini pizza.
  7. Bake in the preheated oven for 10-12 minutes or until the edges are golden brown and the cheese is bubbly.

Pro Tips for Perfect Mini Pizzas

To ensure your heart-shaped mini pizzas turn out perfectly every time, keep these expert tips in mind:

  • Room Temperature Dough: Let the dough sit at room temperature for about 30 minutes before rolling out. This makes it easier to handle.
  • Don’t Overload Toppings: Less is more when it comes to toppings. Too many can make the pizzas soggy.
  • Use Parchment Paper: Line your baking sheet with parchment for easy cleanup and to prevent sticking.
  • Experiment with Sauces: Try using pesto or Alfredo sauce in place of traditional pizza sauce for a unique twist.
  • Cheese Variations: Combine different types of cheese for a more complex flavor profile.
  • Check for Doneness: Keep an eye on the pizzas as they bake. Ovens can vary, so start checking a minute or two early.
  • Let Cool Before Serving: Allow the pizzas to cool slightly before serving to avoid burning mouths!
  • Make Ahead: Prepare the dough and toppings in advance, then assemble and bake right before serving.

Common Mistakes and Troubleshooting

Even the best cooks can encounter hiccups. Here are some common mistakes and how to fix them:

  • Dough Too Sticky: If your dough is sticking to the rolling pin, sprinkle a little flour on top to make it easier to work with.
  • Too Much Sauce: If your pizzas turn out soggy, try using less sauce next time, or allow the sauce to drain slightly before spreading.
  • Baking Issues: If the bottoms are browning too fast, consider lowering the oven temperature by 25°F and extending the cooking time.

Creative Variations

Want to mix things up? Here are some fun variations on your heart-shaped mini pizzas:

  • Veggie Lover’s Delight: Load up on fresh vegetables like spinach, zucchini, and artichokes for a healthier option.
  • Meat Feast: Top with an assortment of meats such as sausage, ham, and bacon for a protein-packed treat.
  • Sweet Treats: Swap the savory toppings for sweet ones like Nutella and strawberries for a dessert version.
  • Breakfast Pizzas: Top with eggs, cheese, and breakfast meats for a fun twist on breakfast.

Storage and Make-Ahead Instructions

Planning a gathering? Here are some tips for storing and preparing in advance:

  • Storage: Store any leftovers in an airtight container in the refrigerator for up to 3 days.
  • Reheating: Reheat in the oven at 350°F (175°C) for about 5-10 minutes to restore crispiness.
  • Make Ahead: Prepare the dough and toppings ahead of time. Assemble the pizzas just before baking for the best results.

Frequently Asked Questions

Here’s a compilation of common questions about heart-shaped mini pizzas:

  • Can I use whole wheat dough? Yes, whole wheat dough is a great alternative for a healthier option.
  • What can I substitute for pizza sauce? You can use pesto, marinara, or even hummus for a different flavor.
  • Are these pizzas suitable for freezing? Yes! Freeze unbaked mini pizzas on a baking sheet, then transfer to a freezer bag. Bake from frozen, adding a few extra minutes to the cooking time.
  • How do I make gluten-free mini pizzas? Use gluten-free pizza dough, which is widely available in stores.
  • Can I use a different cheese? Absolutely! Get creative with your favorite cheeses.
  • How long do they take to bake? Typically, 10-12 minutes, but ovens can vary, so keep an eye on them!
  • Is this recipe kid-friendly? Definitely! Kids will love shaping and decorating their own pizzas.
  • Can I make them smaller or larger? Yes, adjust the cookie cutter size to create different-sized pizzas.

Nutritional Tips and Dietary Adaptations

For those watching their nutrition, consider these adaptations:

  • Low-Calorie Option: Use less cheese and opt for more vegetable toppings to reduce calories.
  • Vegan Adaptation: Substitute dairy cheese with vegan cheese, and ensure the pizza dough is dairy-free.
  • Low-Carb Version: Use a cauliflower crust instead of traditional dough for a lower-carb option.

Essential Equipment Recommendations

Here are a few kitchen items that will make your pizza-making experience smoother:

  • Rolling Pin: A good quality rolling pin helps roll out the dough evenly.
  • Heart-Shaped Cookie Cutter: Essential for achieving that perfect shape.
  • Baking Sheet: A sturdy baking sheet ensures even cooking.
  • Parchment Paper: Prevents sticking and simplifies cleanup.

Serving Suggestions

These mini pizzas are great on their own, but pair them with these items for a complete meal:

  • Fresh Salad: A light salad balances the richness of the pizzas.
  • Garlic Bread: A classic accompaniment that everyone loves.
  • Dips: Serve with marinara or garlic dip for added flavor.

In conclusion, heart-shaped mini pizzas are not just a fun culinary project; they’re a delicious way to bring friends and family together. With endless customization options and quick prep time, they’re perfect for any occasion, from casual dinners to festive celebrations. Follow this guide to make your pizzas, and enjoy the love that comes with every bite!

Heart-Shaped Mini Pizzas

Prep Time 15 minutes
Cook Time 12 minutes
Total Time 27 minutes
Servings 8 pieces
Calories 150
Delight in these adorable heart-shaped mini pizzas, perfect for a fun snack or party treat.

Ingredients

Dough

  • 1 pre-made pizza dough
  • 0.5 cup pizza sauce
  • 1 cup shredded mozzarella cheese
  • Assorted toppings (pepperoni, veggies, etc.)

Instructions 

  • Preheat oven to 400°F (200°C).
  • Roll out dough and cut into heart shapes with a cookie cutter.
  • Spread sauce, add cheese and toppings on each heart.
  • Bake for 10–12 minutes until golden.

Notes

Use a heart-shaped cookie cutter for best results.
Calories: 150kcal
Cost: $10
Course: Snack
Cuisine: American
Keyword: pizza

Ultimate Chocolate Ganache Cake: Your Go-To Indulgence

If you’re in search of the ultimate chocolate ganache cake, look no further. This decadent dessert is not only a feast for the eyes but also a rich and satisfying treat for chocolate lovers everywhere. In just a few simple steps, you can create a luxurious cake that’s perfect for birthdays, celebrations, or any occasion that needs a touch of sweetness. This cake combines moist layers with a luscious ganache, making every bite a delightful experience.

In this comprehensive guide, we’ll explore everything you need to know about making the ultimate chocolate ganache cake—from ingredients to troubleshooting tips—ensuring that you can whip up this delight with confidence.

Why You’ll Love This Recipe

  • Quick and Easy: With simple ingredients and straightforward steps, you can have this cake ready in no time.
  • Rich Flavor: The combination of dark chocolate and cocoa powder creates a deep, intense chocolate experience.
  • Customizable: This recipe allows for various variations, so you can make it your own.
  • Showstopper Presentation: The ganache glaze and chocolate shavings make it visually stunning.
  • Perfect for Any Occasion: Whether it’s a birthday party or a casual gathering, this cake fits right in.

Ingredient Breakdown

Understanding the ingredients is crucial for achieving the best results. Here’s a detailed breakdown:

  • All-Purpose Flour: Provides the structure. You can substitute with gluten-free flour for a gluten-free version.
  • Granulated Sugar: Sweetens the cake. Consider using coconut sugar for a lower glycemic index.
  • Unsweetened Cocoa Powder: The key player for that rich chocolate flavor. Use Dutch-processed cocoa for a smoother taste.
  • Baking Powder & Baking Soda: These leavening agents help the cake rise. Ensure they are fresh for maximum effectiveness.
  • Salt: Enhances the sweetness and balances flavors.
  • Eggs: Contributes moisture and richness. For a vegan option, replace with flax eggs.
  • Whole Milk: Adds moisture. Substitute with almond or oat milk for a dairy-free option.
  • Vegetable Oil: Ensures a moist cake. Can be replaced with melted coconut oil.
  • Vanilla Extract: Adds a lovely aroma and flavor. Use pure vanilla for the best results.
  • Boiling Water: Introduces moisture and helps dissolve the cocoa powder, enhancing flavor.
  • Dark Chocolate Ganache: The star of the show, providing a rich topping.
  • Chocolate Shavings: For decoration, making the cake visually appealing.

How to Make the Ultimate Chocolate Ganache Cake

Close-up of a moist chocolate cake slice revealing luscious ganache drips and rich texture.

Follow these detailed steps for a flawless outcome:

  • Step 1: Preheat your oven to 350°F (175°C) and grease two 8-inch cake pans.
  • Step 2: In a large bowl, mix together the flour, sugar, cocoa powder, baking powder, baking soda, and salt until well combined.
  • Step 3: Add the eggs, milk, vegetable oil, and vanilla extract to the dry ingredients. Beat until the mixture is smooth.
  • Step 4: Carefully stir in the boiling water; the batter will be thin, but this is normal.
  • Step 5: Pour the batter evenly into the prepared pans.
  • Step 6: Bake in the preheated oven for 30-35 minutes, or until a toothpick inserted into the center comes out clean.
  • Step 7: Let the cakes cool in the pans for about 10 minutes, then transfer them to a wire rack to cool completely.
  • Step 8: Once cooled, spread a layer of ganache between the cake layers and on the top.
  • Step 9: Decorate with chocolate shavings and chill for at least 1 hour before serving.

Pro Tips for Success

  • Room Temperature Ingredients: Make sure your eggs and milk are at room temperature for a smoother batter.
  • Don’t Overmix: Mix until just combined to prevent a dense cake.
  • Check Oven Temperature: Use an oven thermometer to ensure accurate baking temperatures.
  • Cool Completely: Let the cakes cool completely before frosting to prevent melting the ganache.
  • Use Quality Chocolate: For the ganache, high-quality dark chocolate will yield the best flavor.
  • Make-Ahead Option: You can bake the cake layers a day in advance and frost them just before serving.
  • Chill Ganache: Let the ganache sit at room temperature to thicken before spreading.
  • Layering: For a more professional look, use a cake leveler to ensure even layers.

Common Mistakes and Troubleshooting

Here are some common pitfalls and how to avoid them:

  • Dense Cake: This can be due to overmixing. Mix until just combined.
  • Dry Cake: Ensure you measure ingredients accurately and do not overbake.
  • Runny Ganache: If your ganache is too thin, let it sit at room temperature or refrigerate it to thicken.
  • Cracked Cake: Avoid opening the oven door too early during baking.

Variations of the Ultimate Chocolate Ganache Cake

Feel free to get creative with these variations:

  • Chocolate Mint: Add a few drops of peppermint extract to the ganache for a refreshing twist.
  • Mocha Flavor: Incorporate instant coffee granules into the batter for a coffee-chocolate blend.
  • Fruit Layer: Add raspberry or cherry filling between the layers for a fruity contrast.
  • Nutty Crunch: Mix chopped nuts into the batter or sprinkle on top of the ganache for added texture.

Storage and Make-Ahead Instructions

Proper storage is key to maintaining the quality of your cake:

  • Refrigeration: Store the cake in an airtight container in the refrigerator for up to 5 days.
  • Freezing: You can freeze the cake layers wrapped tightly for up to 3 months. Just thaw before frosting.
  • Make-Ahead: Bake the cake layers a day in advance; frost just before serving.

Frequently Asked Questions

Here are some common questions about making the ultimate chocolate ganache cake:

  • Can I use a different type of chocolate for the ganache? Yes, you can use milk chocolate or even white chocolate, but adjust the sugar accordingly.
  • How do I know when my cake is done? A toothpick inserted into the center should come out clean or with a few moist crumbs.
  • Can I make this cake gluten-free? Absolutely! Substitute all-purpose flour with a gluten-free blend.
  • What’s the best way to slice a layered cake? Use a hot, clean knife for smooth slices.
  • Can I use this recipe for cupcakes? Yes, fill cupcake liners about 2/3 full and bake for 18-20 minutes.
  • What’s the best way to store leftover ganache? Refrigerate in an airtight container for up to a week.
  • Can I freeze leftover ganache? Yes, you can freeze ganache in a sealed container for up to 2 months.
  • How do I make my ganache glossy? Make sure to use equal parts chocolate and cream by weight, and ensure the cream is hot when mixing.

Nutritional Tips and Dietary Adaptations

This cake can be customized for various dietary needs:

  • Lower Sugar: Use a natural sweetener like stevia or erythritol in place of granulated sugar.
  • Dairy-Free: Replace milk with almond or coconut milk and use dairy-free chocolate.
  • Vegan: Substitute eggs with flax eggs or applesauce and follow the dairy-free tips.

Equipment Recommendations

For best results, consider having the following tools on hand:

  • Mixing Bowls: A set of mixing bowls in various sizes for combining ingredients.
  • Cake Pans: Two 8-inch round cake pans for even baking.
  • Stand Mixer: For effortless mixing and incorporating air into the batter.
  • Offset Spatula: Perfect for spreading ganache evenly over the cake.
  • Cake Leveler: To achieve even layers for a professional finish.

Serving Suggestions

Here are some ideas to elevate your chocolate ganache cake experience:

  • Ice Cream Pairing: Serve with a scoop of vanilla or coffee ice cream for an indulgent treat.
  • Fresh Berries: Top with raspberries or strawberries for a fresh and vibrant contrast.
  • Whipped Cream: A dollop of whipped cream can add lightness to the rich cake.
  • Chocolate Sauce: Drizzle with additional chocolate sauce for extra decadence.

Now that you have all the tools and tips needed to create this stunning cake, it’s time to gather your ingredients and start baking. Remember, the ultimate chocolate ganache cake is not just a dessert; it’s an experience worth savoring. Happy baking!

Ultimate Chocolate Ganache Cake

Prep Time 20 minutes
Cook Time 35 minutes
Total Time 55 minutes
Servings 12 pieces
Calories 450
A rich and decadent chocolate cake layered with smooth ganache and topped with chocolate shavings, perfect for special occasions.

Ingredients

Dry Ingredients

  • 2 cups all-purpose flour
  • 1 3/4 cups granulated sugar
  • 3/4 cup unsweetened cocoa powder
  • 2 teaspoons baking powder
  • 1 1/2 teaspoons baking soda
  • 1 teaspoon salt

Wet Ingredients

  • 2 large eggs
  • 1 cup whole milk
  • 1/2 cup vegetable oil
  • 2 teaspoons vanilla extract
  • 1 cup boiling water

Filling & Topping

  • 2 cups dark chocolate ganache
  • 1 cup chocolate shavings

Instructions 

  • Preheat oven to 350°F (175°C). Grease two 8-inch pans.
  • Mix dry ingredients, then add eggs, milk, oil, vanilla; beat until smooth.
  • Stir in boiling water until thin; pour into pans.
  • Bake 30-35 minutes; cool completely.
  • Spread ganache between layers and on top; decorate with shavings.

Notes

Ensure the ganache is at room temperature before spreading for best results.
Calories: 450kcal
Cost: $20
Course: Dessert
Cuisine: international
Keyword: chocolate

Welcome to a world of flavor with these raspberry coconut bars, where sweetness meets a delightful crunch! In this guide, you’ll discover the secrets to crafting the perfect low-carb dessert that not only satisfies your sweet tooth but also keeps your dietary goals in check. This recipe is designed for simplicity and deliciousness, making it a go-to treat any time you need a quick dessert fix. Let’s dive in!

Why You’ll Love This Recipe

These raspberry coconut bars are more than just a dessert; they are a culinary experience. Here are five compelling reasons to try this recipe:

  • Low-Carb Delight: Perfect for those following a keto or low-carb lifestyle, these bars deliver flavor without the guilt.
  • Quick and Easy: With straightforward steps, you’ll have these bars ready in no time, making them ideal for busy weeknights.
  • Rich in Flavor: The combination of tart raspberry filling and sweet coconut creates a taste sensation that’s hard to resist.
  • Versatile Treat: Great as a snack, dessert, or even a gift, these bars adapt to any occasion.
  • Make Ahead: Prepare them in advance and store for an easy dessert option whenever cravings strike.

Ingredient Breakdown

Understanding your ingredients is key to mastering this recipe. Here’s what you need:

  • ½ cup butter: Provides a rich base and moisture for the bars.
  • 4 ounces cream cheese: Adds creaminess and a subtle tang, enhancing the overall flavor.
  • 1¾ cup almond flour: A low-carb alternative to traditional flour, ensuring a gluten-free option.
  • ¼ cup coconut flour: Contributes to the texture and flavor, while keeping the carb count low.
  • ⅓ cup sugar substitute (1:1 sugar ratio): Sweetens the bars without the calories of sugar. You can use erythritol or monk fruit for a keto-friendly option.
  • 1 egg: Binds the ingredients together for a cohesive texture.
  • ½ cup raspberry preserves (sugar-free): The heart of the bars, providing tartness and sweetness.
  • 2 eggs: A second addition for the filling, ensuring richness.
  • 1 cup sugar substitute (1:1 sugar ratio): Balances the filling’s sweetness.
  • ½ teaspoon almond extract: Enhances flavor with a warm, nutty undertone.
  • 2½ cups unsweetened flaked coconut: Adds texture and a tropical flair.

Pro Tips for Perfect Bars

To elevate your baking game, consider these expert tips:

  • Room Temperature Ingredients: Ensure your butter and cream cheese are at room temperature for easy mixing.
  • Don’t Overmix: When combining your crust ingredients, mix just until they come together to maintain a tender texture.
  • Chill the Bars: For cleaner cuts, chill the bars in the refrigerator after baking before slicing.
  • Use Parchment Paper: Lining your baking pan with parchment paper makes it easy to lift the bars out once cooled.
  • Experiment with Flavors: Feel free to add nuts, chocolate chips, or spices like cinnamon for a unique twist.
  • Watch the Baking Time: Ovens vary; keep an eye on the bars to prevent over-baking.
  • Store Properly: Keep leftovers in an airtight container to maintain freshness.

Common Mistakes and Troubleshooting

Delicious Raspberry Coconut Bars with vibrant pink raspberry filling and coconut flakes.

Even seasoned bakers can hit a snag. Here are some common pitfalls and how to avoid them:

  • Crust Crumbling: If your crust crumbles, it may be due to too much flour. Ensure accurate measurements.
  • Filling Runny: If your filling doesn’t set, check that you’re using enough egg and sugar substitute.
  • Bars Too Sweet: Adjust the sugar substitute to your taste preference; not all brands have the same sweetness level.
  • Burnt Edges: If the edges are browning too quickly, cover them with foil while baking.

Variations & Substitutions

Make this recipe your own with these variations:

  • Nutty Addition: Incorporate chopped walnuts or pecans into the crust for added crunch.
  • Chocolate Lovers: Add sugar-free chocolate chips to the filling for a decadent twist.
  • Fruit Fusion: Mix in other fruit preserves, like strawberry or blueberry, for a different flavor profile.
  • Vegan Version: Substitute eggs with flaxseed meal and use plant-based cream cheese and butter.

Storage and Make-Ahead Instructions

These bars can be made ahead of time and stored easily:

  • Refrigeration: Store in an airtight container in the fridge for up to one week.
  • Freezing: Freeze individual squares between layers of parchment paper for up to three months. Thaw in the fridge before serving.
  • Make Ahead: Bake a batch on the weekend and enjoy throughout the week as a quick snack or dessert.

Comprehensive FAQ

Here are some frequently asked questions to enhance your baking experience:

  • Can I use fresh raspberries?: While fresh raspberries can be used, they may add excess moisture. Stick to preserves for the best results.
  • Is this recipe gluten-free?: Yes, using almond and coconut flours ensures the bars are gluten-free.
  • How do I make these bars sugar-free?: Use a sugar substitute that measures 1:1 with sugar for a sugar-free option.
  • Can I make these bars dairy-free?: Yes, substitute butter with coconut oil and cream cheese with a dairy-free alternative.
  • How long do these bars last?: They can be stored in the fridge for up to one week or frozen for three months.
  • What is the best way to cut the bars?: Use a sharp knife and clean it between cuts for neat squares.
  • Can I add more coconut?: Absolutely! Feel free to adjust the coconut amount to your liking.
  • Do I need to add xanthan gum?: No, xanthan gum is not necessary for this recipe as the eggs provide enough binding.

Nutrition Tips and Dietary Adaptations

For those mindful of nutrition, here’s how to adapt:

  • Low-Carb Count: Each bar contains minimal carbs, making it suitable for low-carb diets.
  • Keto-Friendly: With high fat and low carbs, this is an excellent choice for ketogenic eating.
  • Added Fiber: Using almond flour increases fiber content compared to traditional flour, supporting digestive health.
  • Protein Boost: The eggs contribute protein, making this a more balanced treat.

Equipment Recommendations

To successfully prepare these bars, consider the following kitchen tools:

  • 8 x 8-inch Baking Pan: Perfect size for this recipe; ensure it’s lined with parchment paper.
  • Mixing Bowls: Use medium-sized bowls for mixing the crust and filling separately.
  • Whisk: Ideal for beating eggs and mixing ingredients thoroughly.
  • Pastry Cutter or Food Processor: Great for achieving a crumbly texture for the crust.

Serving Suggestions

These bars shine on their own, but pairing them can elevate your dessert game:

  • With Whipped Cream: A dollop of whipped cream enhances the sweetness and adds creaminess.
  • Ice Cream Accompaniment: Serve warm bars with a scoop of sugar-free vanilla ice cream.
  • Fruit Garnish: Fresh raspberries or mint leaves add a touch of color and freshness.
  • Chocolate Drizzle: A drizzle of melted sugar-free chocolate takes these bars to the next level.

In conclusion, making these raspberry coconut bars is not just about following a recipe; it’s about creating a delectable experience that fits your lifestyle. Enjoy the process, share them with loved ones, and relish in the satisfaction of a job well done. Happy baking!

Raspberry Coconut Bars Recipe

Prep Time 20 minutes
Cook Time 40 minutes
Total Time 1 hour
Servings 20 squares
Calories 250
Delight in these luscious raspberry coconut bars with a buttery crust and a sweet, nutty topping.

Ingredients

Dough and Filling

  • ½ cup butter
  • 4 ounces cream cheese
  • cup almond flour
  • ¼ cup coconut flour
  • cup sugar substitute ((1:1 sugar ratio))
  • 1 egg egg
  • ½ cup raspberry preserves ((sugar-free))
  • 2 eggs eggs
  • 1 cup sugar substitute with a 1:1 sugar ratio
  • ½ teaspoon almond extract
  • cups unsweetened flaked coconut

Instructions 

  • Preheat oven to 375°F (190°C). Line an 8x8 inch pan with parchment, leaving overhang.
  • Mix flour, butter, cream cheese, and sugar until crumbly. Add egg and mix until combined. Press into pan and bake for 15-20 minutes.
  • Beat eggs, then stir in sugar, almond extract, and coconut flakes. Spread raspberry preserves over crust, then top with coconut mixture.
  • Bake for 20-25 minutes until golden. Cool, then cut into 20 squares.

Notes

Ensure coconut is evenly spread for consistent baking.
Calories: 250kcal
Cost: $15
Course: Dessert
Keyword: bars, coconut, raspberry

Why This Strawberry Shortcake Cake Will Become Your Go-To Dessert

There’s something undeniably delightful about a well-made strawberry shortcake. This recipe stands out for its simplicity and the way it combines tender cake layers, juicy berries, and light whipped cream into a harmonious dessert that suits any occasion. Whether you’re celebrating a birthday, hosting a summer barbecue, or simply treating yourself, this strawberry shortcake cake is sure to impress. Let’s dive into why this cake should grace your table.

  • Easy to Make: With just five straightforward steps, you can whip up this impressive cake without spending hours in the kitchen.
  • Fresh Ingredients: Utilizing fresh strawberries ensures that every bite bursts with flavor and sweetness.
  • Perfect for Any Occasion: From picnics to parties, this cake is versatile enough to suit any celebration.
  • Customizable: Feel free to experiment with different fruits or toppings to make it your own.
  • Memorable Presentation: The layered look of the cake makes it visually appealing, perfect for showing off your baking skills!

Essential Ingredients for Your Strawberry Shortcake Cake

Before you start, gather the following ingredients. Each plays a crucial role in achieving the perfect flavor and texture.

  • 2 cups all-purpose flour: This is the base of your cake, providing structure.
  • 1 cup granulated sugar: Sweetens the cake and helps achieve a moist texture.
  • 1 tbsp baking powder: Aids in leavening, giving the cake its lightness.
  • 1/2 tsp salt: Balances the sweetness and enhances flavor.
  • 1/2 cup unsalted butter, softened: Adds richness and moisture.
  • 3/4 cup milk: Keeps the batter smooth and contributes to the cake’s tenderness.
  • 2 large eggs: Binds the ingredients together and adds moisture.
  • 1 tsp vanilla extract: Infuses the cake with a warm, aromatic flavor.
  • 2 cups fresh strawberries, sliced: The star of the show, adding freshness and a delightful sweetness.
  • 1 cup heavy whipping cream: Essential for the luscious whipped topping.
  • 2 tbsp powdered sugar: Sweetens the whipped cream to perfection.

How to Make Your Strawberry Shortcake Cake in 5 Steps

Now that you have your ingredients ready, let’s walk through the process of making this delectable cake.

  1. Preheat your oven to 350°F. Grease and flour two 8-inch round cake pans to ensure easy removal after baking.
  2. Mix the dry ingredients: In a large bowl, combine the flour, sugar, baking powder, and salt.
  3. Add wet ingredients: Mix in the softened butter, milk, eggs, and vanilla extract. Beat until the batter is smooth and well combined.
  4. Bake the cake layers: Divide the batter evenly between the prepared pans. Bake for 25-30 minutes or until a toothpick inserted into the center comes out clean.
  5. Cool and assemble: Let the cakes cool in the pans for 10 minutes, then transfer to a wire rack. Once cooled, whip the heavy cream with powdered sugar until stiff peaks form. Layer the first cake on a plate, spread half of the whipped cream, and top with half the strawberries. Place the second cake on top, repeating the process with the remaining cream and strawberries.

Pro Tips for the Perfect Strawberry Shortcake Cake

A mouthwatering strawberry shortcake with cream icing and strawberry garnish.

To ensure your cake impresses every time, consider these expert tips:

  • Use fresh strawberries: Fresh berries provide the best flavor and texture. Avoid using frozen or canned strawberries.
  • Chill your mixing bowl: For the best whipped cream, chill the bowl and beaters before whipping the cream.
  • Don’t overmix: When combining ingredients, mix just until everything is incorporated to maintain a tender cake.
  • Adjust sweetness: Depending on your taste preferences and the strawberries’ sweetness, feel free to adjust the sugar in the whipped cream.
  • Layer thoughtfully: For an even distribution of cream and strawberries, layer them carefully, making sure each slice has a bit of everything.
  • Serve promptly: While the cake can be refrigerated, it’s best served fresh to enjoy the texture and flavor.
  • Experiment with flavors: Try adding a hint of lemon zest to the whipped cream for a refreshing twist.
  • Consider gluten-free options: Substitute all-purpose flour with a gluten-free blend if necessary.

Common Mistakes and Troubleshooting

Even the best bakers can face challenges. Here are some common pitfalls and how to avoid them:

  • Dry cake: Ensure you’re measuring your flour correctly; too much flour can lead to dryness.
  • Whipped cream not holding shape: Make sure the cream is very cold and whip it until stiff peaks form, but don’t overwhip.
  • Strawberries too mushy: Use firm, fresh strawberries and avoid letting them sit in sugar for too long before layering.
  • Cake layers sticking: Properly grease and flour the pans, and let the cakes cool before attempting to remove them.

Delicious Variations to Try

Don’t hesitate to get creative with this recipe! Here are some fun variations:

  • Chocolate Strawberry Shortcake: Add cocoa powder to the cake batter for a chocolate twist.
  • Berry Medley: Mix in other berries like blueberries or raspberries for a mixed berry flavor.
  • Nutty Addition: Fold in chopped nuts like almonds or pecans into the cake batter for added crunch.
  • Layered with Cream Cheese: Substitute half the whipped cream with cream cheese for a richer frosting.

Storage and Make-Ahead Instructions

This cake is best enjoyed fresh, but you can prepare components ahead of time:

  • Make the cake layers: Bake the layers and store them wrapped tightly in plastic wrap at room temperature for up to 2 days.
  • Prepare the whipped cream: Whipped cream can be made ahead of time and stored in the refrigerator for a couple of hours, but it’s best when freshly whipped.
  • Assemble on the day of serving: For the best texture and flavor, assemble the cake just before serving.

Frequently Asked Questions

Got questions? Here are answers to some common inquiries about making strawberry shortcake cake:

  • Can I use frozen strawberries? It’s best to use fresh strawberries for optimal flavor and texture, but if you must use frozen, ensure they are thawed and drained.
  • How do I know when the cake is done? A toothpick inserted into the center should come out clean or with a few moist crumbs.
  • What can I use instead of heavy cream? You can substitute with coconut cream for a dairy-free alternative.
  • How long will leftovers last? The assembled cake can be stored in the refrigerator for up to 2 days, but it’s best enjoyed fresh.
  • Can I make this gluten-free? Yes, use a gluten-free flour blend that measures cup-for-cup with all-purpose flour.
  • What other fruits can I use? Feel free to experiment with peaches, blueberries, or even mango for a tropical twist.
  • Do I need to frost the sides of the cake? It’s optional! A naked cake look can be just as beautiful.
  • Can I add flavor to the whipped cream? Absolutely! Try adding vanilla extract, almond extract, or even a splash of liqueur for extra flavor.

Nutritional Tips and Dietary Adaptations

Want to make this dessert a bit healthier? Here are some suggestions:

  • Reduce sugar: Cut down on the sugar in the cake and whipped cream to lower calories.
  • Use whole wheat flour: Substitute with whole wheat flour for added fiber.
  • Low-fat dairy options: Use low-fat milk and whipped topping for a lighter version.
  • Vegan adaptation: Substitute eggs with flax eggs and use plant-based milk and cream alternatives.

Essential Equipment for Baking

Having the right tools can make your baking experience smoother. Here’s what you’ll need:

  • Two 8-inch round cake pans: Ensures even baking and easy layering.
  • Mixing bowls: A set of various sizes will help with ingredient mixing.
  • Electric mixer: A handheld or stand mixer will make whipping the cream a breeze.
  • Measuring cups and spoons: Precision in measuring is key to perfect results.
  • Cooling rack: Essential for cooling your cake layers properly.

Serving Suggestions

To elevate your dessert experience, consider these serving ideas:

  • Garnish with mint leaves: Add a touch of freshness with a sprig of mint.
  • Drizzle with chocolate: A light drizzle of chocolate syrup adds a decadent touch.
  • Plate with extra strawberries: Serve with additional fresh strawberries on the side.
  • Pair with ice cream: A scoop of vanilla ice cream pairs beautifully with the cake.

Conclusion

With this Effortless Strawberry Shortcake Cake, you’re well on your way to creating a memorable dessert that will delight your family and friends. Follow these steps and tips, and you’ll be rewarded with a cake that embodies the essence of summer in every bite. Remember, cooking should be enjoyable and rewarding, so take your time, experiment, and most importantly, have fun in the kitchen!

Unforgettable Strawberry Shortcake Cake in 5 Simple Steps

Prep Time 20 minutes
Cook Time 30 minutes
Total Time 50 minutes
Servings 8 pieces
Calories 450
A delightful layered strawberry shortcake cake perfect for any celebration, combining fluffy cake, fresh strawberries, and whipped cream.

Ingredients

Dry ingredients

  • 2 cups all-purpose flour
  • 1 cup granulated sugar
  • 1 tbsp baking powder
  • 1/2 tsp salt

Wet ingredients

  • 1/2 cup unsalted butter, softened
  • 3/4 cup milk
  • 2 large eggs eggs
  • 1 tsp vanilla extract

Filling and topping

  • 2 cups fresh strawberries, sliced
  • 1 cup heavy whipping cream
  • 2 tbsp powdered sugar

Instructions 

  • Preheat oven to 350°F (175°C). Grease and flour two 8-inch pans.
  • Mix flour, sugar, baking powder, and salt. Add butter, milk, eggs, and vanilla; beat until smooth.
  • Divide batter into pans; bake for 25-30 minutes. Cool completely.
  • Whip heavy cream with powdered sugar until stiff peaks form. Layer cake with whipped cream and strawberries.
  • Assemble, then serve immediately or refrigerate for up to 2 hours.

Notes

Use fresh strawberries for best flavor and texture.
Calories: 450kcal
Cost: $15
Course: Dessert
Keyword: cake, strawberry

Kickstart Your Mornings: The Ultimate Guide to Healthy Breakfast Egg Muffins

Are you looking for a quick, nutritious breakfast that can be made ahead of time? Look no further! These Healthy Breakfast Egg Muffins are not just tasty but also packed with vegetables, making them a perfect start to your day. This recipe is designed for busy mornings, requiring minimal effort while delivering maximum flavor. In this comprehensive guide, we will explore everything you need to know about making delicious egg muffins, including tips, variations, and storage methods.

  • Convenience: These muffins can be made in advance, so you can grab one on your way out the door.
  • Customizable: Feel free to swap in your favorite vegetables or proteins based on what you have on hand.
  • Nutritious: Packed with protein and fiber, they will keep you full and energized.
  • Low-carb option: Perfect for those looking to reduce their carbohydrate intake while still enjoying a satisfying breakfast.
  • Kid-friendly: A great way to sneak in veggies for picky eaters!

Ingredients Breakdown: What You’ll Need

To make these egg muffins, here’s a detailed list of ingredients along with some suggestions for substitutions:

  • 10 large eggs: Eggs are the base of this recipe, providing protein and structure. You can substitute with flax eggs for a vegan option.
  • 1/3 cup milk: Use regular or unsweetened dairy-free milk (almond, oat, or soy). This adds moisture.
  • 1 cup baby spinach: Fresh spinach gives a vibrant color and nutrients. You can use other greens like kale or Swiss chard.
  • 1/2 cup red bell pepper: Finely diced for sweetness and crunch. Feel free to use green bell pepper or even jalapeños for a spicy kick.
  • 1/2 cup zucchini: Finely diced; remember to squeeze out excess moisture to prevent sogginess.
  • 1/4 cup onion: Red or green onions add flavor; shallots can be used as a milder alternative.
  • 1/2 cup shredded cheese: Cheddar, feta, or mozzarella. Omit for a dairy-free version or use a vegan cheese alternative.
  • 2 tablespoons fresh herbs: Parsley or chives enhance flavor; feel free to experiment with basil or oregano.
  • 1 clove garlic: Minced (optional) for added depth of flavor.
  • Spices: 1/2 teaspoon salt, 1/4 teaspoon black pepper, and optional smoked paprika or chili flakes for a bit of heat.
  • Olive oil: For greasing the muffin tin; you can also use nonstick cooking spray.

Step-by-Step Instructions: How to Make Your Egg Muffins

Follow these simple steps to create your delicious egg muffins:

  1. Preheat your oven to 350°F (175°C). Generously grease a 12-cup muffin tin with olive oil or nonstick cooking spray.
  2. Chop all vegetables into small, uniform pieces to ensure even cooking.
  3. Pat the zucchini dry with a paper towel to avoid watery muffins.
  4. In a large bowl, whisk together the eggs, milk, salt, pepper, and any spices until smooth and slightly frothy.
  5. Fold in the chopped spinach, bell pepper, zucchini, onion, herbs, garlic (if using), and cheese. Mix well to combine.
  6. Evenly divide the mixture among the muffin cups, filling each about 3/4 full.
  7. Gently tap the muffin tin on the counter to settle the mixture.
  8. Place it in the middle rack of the preheated oven and bake for 18–22 minutes, until the centers are just set and a toothpick inserted comes out clean.
  9. Allow the muffins to cool in the tin for 5 minutes, then run a thin spatula or butter knife around the edges to release them.
  10. Enjoy warm, or allow to cool completely for storage.

Pro Tips for Perfect Egg Muffins

Delicious individual egg muffins filled with chopped vegetables, ready for breakfast.

To ensure your egg muffins come out perfectly every time, consider these expert insights:

  • Use fresh ingredients: Fresh vegetables and eggs yield the best flavor and texture.
  • Don’t overfill: Filling muffin cups too much can lead to overflow. Stick to 3/4 full.
  • Experiment with spices: Customize flavors by adding your favorite spices, such as cumin or Italian seasoning.
  • Check doneness: The muffins should be lightly golden and firm in the center.
  • Allow for cooling: Letting them cool in the pan helps them firm up and makes them easier to remove.
  • Consider portion sizes: Adjust the sizes based on your needs; mini muffin tins are great for smaller bites.
  • Make in batches: Double or triple the recipe to have plenty on hand for the week.
  • Reheat properly: Microwave for 30 seconds or warm in an oven to maintain texture.

Common Mistakes and Troubleshooting

Even the best chefs make mistakes! Here are some common issues you might face and how to fix them:

  • Muffins are too dry: Ensure you’re not overbaking. Check for doneness at the lower end of the time range.
  • Muffins are soggy: Make sure to squeeze out excess moisture from zucchini and other watery vegetables.
  • Sticking to the pan: Grease the muffin tin generously, and allow muffins to cool slightly before removing.
  • Uneven cooking: Make sure to chop vegetables uniformly for even cooking throughout the muffins.

Delicious Variations You Can Try

These egg muffins are incredibly versatile. Here are some ideas to change things up:

  • Southwestern Style: Add black beans, corn, and diced jalapeños for a spicy twist.
  • Italian Delight: Incorporate diced tomatoes, spinach, and Italian sausage, topped with mozzarella cheese.
  • Mediterranean Flare: Mix in sun-dried tomatoes, olives, and feta cheese for a taste of the Mediterranean.
  • Breakfast Sausage: Use cooked and crumbled breakfast sausage for a heartier option.

Storage and Make-Ahead Instructions

These muffins are perfect for meal prep! Here’s how to store and reheat them:

  • Storage: Keep cooled muffins in an airtight container in the refrigerator for up to 5 days.
  • Freezing: Freeze individual muffins in a single layer, then transfer to a freezer-safe bag for up to 3 months.
  • Reheating: Microwave frozen muffins for about 1 minute or until heated through. Alternatively, warm in the oven at 350°F (175°C) for 10-15 minutes.

Comprehensive FAQ: Your Questions Answered

Here are some frequently asked questions about egg muffins:

  • Can I use egg whites instead of whole eggs? Yes, using egg whites will reduce the fat content but may change the texture slightly.
  • Do I need to cook the vegetables first? Not necessary, but cooking harder vegetables like carrots can enhance their flavor.
  • How long do they last in the fridge? They can last up to 5 days in the refrigerator when stored properly.
  • Can I make them dairy-free? Absolutely! Just omit the cheese or use a dairy-free alternative.
  • What’s the best cheese for these muffins? Cheddar, mozzarella, or feta work well, but feel free to experiment with your favorites.
  • Can I add meat? Yes, cooked bacon, sausage, or ham can be added for extra protein.
  • Are they suitable for freezing? Yes! They freeze well and are easy to reheat.
  • How can I increase the protein content? Consider adding cottage cheese or using more eggs in the recipe.

Nutritional Tips and Dietary Adaptations

These muffins can cater to various dietary preferences. Here are some tips:

  • Low-carb: Skip the cheese or use low-fat options to reduce calories.
  • Gluten-free: Ensure all ingredients, like cheese or any spices, are certified gluten-free.
  • High-protein: Add a scoop of protein powder to the egg mixture for an extra boost.
  • Vegetarian: Simply omit any meat additions for a delicious vegetarian option.

Essential Equipment Recommendations

To get started, here’s some equipment you’ll need:

  • Muffin tin: A standard 12-cup muffin tin is ideal.
  • Mixing bowls: Use a large bowl for mixing the egg mixture.
  • Whisk: A sturdy whisk ensures a well-blended egg mixture.
  • Spatula: A rubber spatula helps with folding in ingredients.
  • Measuring cups and spoons: For accurate ingredient measurements.

Serving Suggestions: How to Enjoy Your Egg Muffins

These muffins can be served in various ways:

  • With avocado: Top with sliced avocado for creaminess.
  • With salsa: A dollop of salsa adds a fresh kick.
  • On a bed of greens: Serve over a bed of mixed greens for a light lunch.
  • As a snack: These muffins make a great on-the-go snack for busy days.

Conclusion: Enjoy Your Delicious Egg Muffins!

Now that you have all the tools and knowledge to create your own Healthy Breakfast Egg Muffins, it’s time to get cooking! Whether you choose to enjoy them fresh out of the oven or meal prep for the week, these muffins are sure to become a staple in your breakfast routine. Remember, the key to great cooking is experimentation—feel free to make this recipe your own. Happy cooking!

Healthy Breakfast Egg Muffins With Vegetables

Prep Time 10 minutes
Cook Time 20 minutes
Total Time 30 minutes
Servings 12 muffins
Calories 150
Start your day with these nutritious and customizable egg muffins packed with fresh vegetables and cheese, perfect for a quick breakfast.

Ingredients

Eggs and Dairy

  • 10 large eggs
  • 1/3 cup milk or unsweetened dairy-free milk ((almond, oat, or soy))

Vegetables

  • 1 cup baby spinach, chopped
  • 1/2 cup red bell pepper, finely diced
  • 1/2 cup zucchini, finely diced ((squeeze out excess moisture))
  • 1/4 cup red onion or green onion, finely chopped

Cheese and Herbs

  • 1/2 cup shredded cheese (cheddar, feta, mozzarella, or dairy-free alternative) (optional)
  • 2 tablespoons fresh parsley or chives, chopped
  • 1 clove garlic, minced (optional)
  • 1/2 teaspoon salt
  • 1/4 teaspoon black pepper
  • 1/4 teaspoon smoked paprika or chili flakes (optional)

Cooking spray or oil

  • Olive oil or nonstick cooking spray (for greasing muffin tin)

Instructions 

  • Preheat oven to 350°F (175°C) and grease a 12-cup muffin tin.
  • Chop vegetables and pat zucchini dry.
  • Whisk eggs, milk, salt, pepper, and spices until smooth. Stir in vegetables, herbs, garlic, and cheese.
  • Divide mixture into muffin cups, about 3/4 full. Bake for 18–22 minutes until set.
  • Let rest 5 minutes, then run a spatula around edges to release. Serve warm or cooled.

Notes

Use fresh vegetables for best flavor. Store leftovers in an airtight container in the fridge.
Calories: 150kcal
Cost: $15
Course: Breakfast
Keyword: Eggs, Healthy, Vegetables