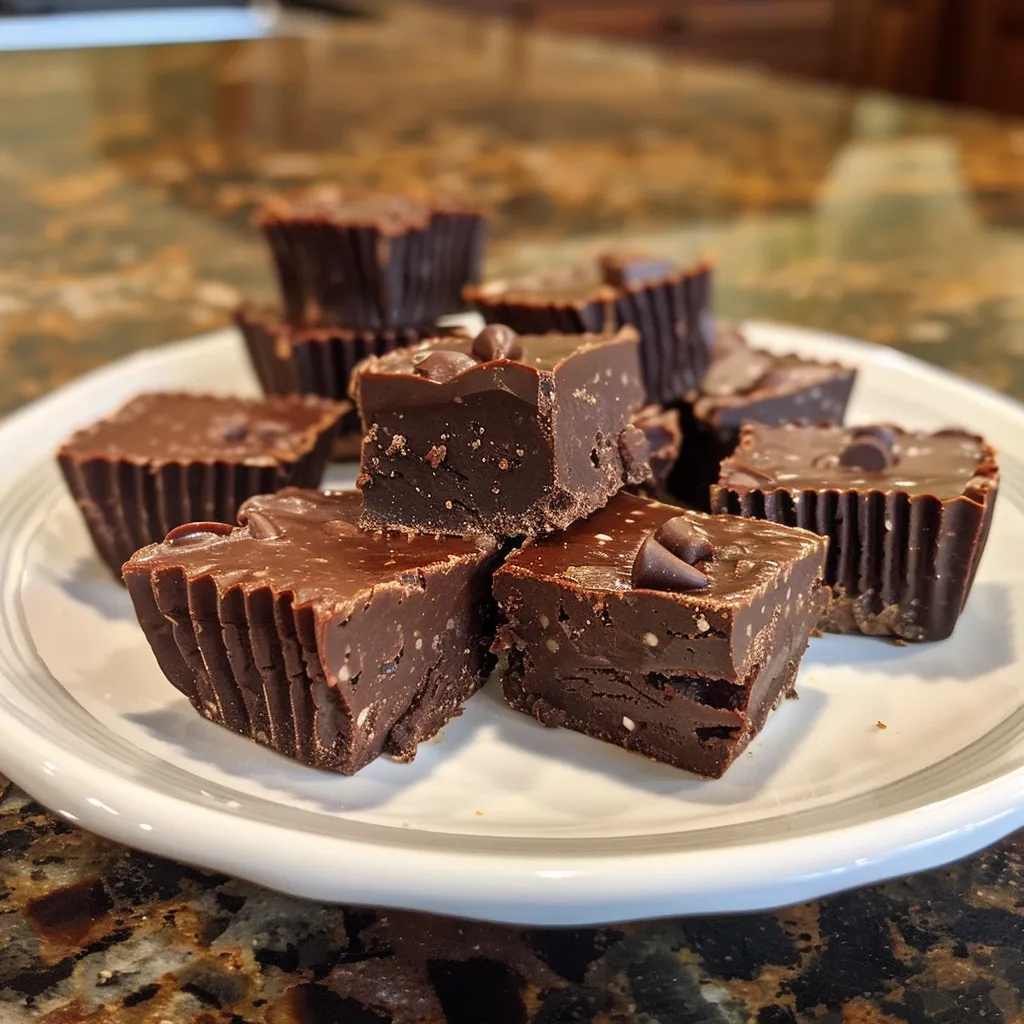
Satisfy your sweet tooth with these easy No Bake Brownie Bites. Quick to prepare and irresistibly delicious, these bites are perfect for any occasion. With a rich chocolate flavor and a fudgy texture, they’re the ideal treat when you want something special without the fuss of baking. If you’re looking for a dessert that’s both satisfying and simple, this recipe is for you. Let’s dive into how to make these delightful bites and why you’ll love them!
Why You’ll Love This Recipe
- Quick and Easy: With simple ingredients and no baking required, these brownie bites come together in just 30 minutes, making them perfect for last-minute gatherings or cravings.
- Deliciously Indulgent: Each bite is packed with rich chocolate flavor, ensuring that your sweet tooth is satisfied with every mouthful.
- Customizable: The recipe is flexible, allowing you to swap out ingredients or add your favorite toppings for a personal touch.
- No Special Equipment Needed: You can prepare these bites using basic kitchen tools like a mixing bowl and a microwave, making this recipe accessible to everyone.
- Perfect for Sharing: With around 35 bites, they make an excellent treat for parties, picnics, or just a sweet snack at home.
Ingredients Breakdown
Before we get started, let’s look at the ingredients you’ll need and some potential substitutions. This will help you gather everything you need to make these brownie bites a reality.
- 1 cup all-purpose flour (heat-treated): Essential for structure; heat treating ensures safety. You can substitute with almond flour for a gluten-free version.
- 1/4 cup Dutch process cocoa powder: This gives the bites a deep chocolate flavor. For a different taste, try using unsweetened cocoa powder.
- 1/2 teaspoon salt: Enhances sweetness and balances flavors.
- 1 cup semi-sweet chocolate chips: The main source of chocolate flavor. Feel free to use dark or milk chocolate chips based on your preference.
- 6 tablespoons unsalted butter: Adds richness. Coconut oil can be a dairy-free substitute.
- 1/2 cup granulated sugar: Sweetens the bites; you can use coconut sugar for a more natural option.
- 3/4 cup light brown sugar: Adds moisture and a hint of caramel flavor. Dark brown sugar can be used for a deeper taste.
- 1/4 cup heavy cream: Contributes to the fudgy texture; use coconut cream for a dairy-free alternative.
- 1 teaspoon vanilla extract: Enhances flavor; you might also try almond extract for a twist.
- 1/2 cup mini chocolate chips: Folded into the mixture for extra chocolatey goodness.
- 2 cups milk chocolate chips (or semi-sweet/dark): For dipping the brownie bites; choose your favorite type of chocolate.
- 2 teaspoons coconut oil (or shortening): Helps to thin the chocolate for dipping, ensuring a smooth coating.
How to Make No Bake Brownie Bites
Now that we have our ingredients ready, let’s walk through the steps of making these delicious no-bake brownie bites.
Step 1: Heat-Treat the Flour
Heat treat your flour to eliminate any risk of foodborne illness. You can do this in the microwave or oven:
- In the Microwave: Spread the flour on a microwave-safe plate. Microwave in 30-second intervals, stirring in between, until it reaches 165°F. Allow it to cool completely before using.
- In the Oven: Spread the flour on a baking sheet and bake at 350°F for about 5-10 minutes, ensuring it reaches 165°F. Let it cool.
Step 2: Combine Dry Ingredients
In a medium bowl, mix the cooled heat-treated flour, cocoa powder, and salt. Stir until well combined and set aside.
Step 3: Melt Chocolate and Butter
In a microwave-safe bowl, combine the semi-sweet chocolate chips and butter (cut into 1 tablespoon pieces). Microwave in 30-second increments, stirring every 15 seconds until fully melted and smooth. This should take about 1.5 minutes total.
Step 4: Mix Wet Ingredients
Using a stand mixer or hand mixer, combine the melted chocolate-butter mixture with granulated sugar and brown sugar. Beat on medium speed for about 2 minutes until completely smooth. Add the heavy cream and vanilla extract, mixing until light and creamy.
Step 5: Combine Dry and Wet Mixtures
Gradually add the dry mixture to the wet mixture and beat until just combined. Avoid overmixing, as this could affect the texture of your bites.
Step 6: Fold in Mini Chocolate Chips
Gently fold the mini chocolate chips into the batter using a spatula. If the dough appears too wet, add an additional 1-2 tablespoons of heat-treated flour. If it’s too dry, add a touch more heavy cream.
Step 7: Shape the Dough
Using a 1-tablespoon measuring spoon, portion out the brownie batter into balls. You should yield approximately 35 bites. Roll them into even-sized balls and chill them in the fridge for about 15 minutes.
Step 8: Prepare for Dipping
Line a large sheet pan with parchment paper or a silicone liner. In a separate microwave-safe bowl, combine the chocolate chips and coconut oil for dipping. Heat in bursts of 20 seconds, stirring between each burst until smooth.
Step 9: Dip the Brownie Bites
To dip, use a fork to lift each brownie bite and immerse it in the melted chocolate. Tap the fork gently against the bowl to remove excess chocolate and place the coated bite back on the parchment-lined pan.
Step 10: Let Set
Allow the chocolate to set at room temperature. While these bites are best enjoyed the same day, they can be stored in the fridge for 3-4 days. For longer storage, consider freezing them uncoated.
Pro Tips for Perfect Brownie Bites
Enhance your brownie bite-making experience with these expert insights:
- Temperature Matters: Ensure your chocolate is not too hot when dipping, as it can cause the brownie bites to melt. Let it cool slightly if needed.
- Chill for Better Coating: Chilling the brownie bites before dipping helps the chocolate coating solidify faster and prevents melting.
- Experiment with Flavors: Add a pinch of espresso powder to the batter for a mocha flavor or use flavored extracts for a unique twist.
- Make Ahead: These bites can be made a day in advance, making them a fantastic option for parties or busy weeks.
- Use High-Quality Chocolate: The type of chocolate you use greatly affects the flavor; choose a brand you love.
- Don’t Rush Cooling: Allow the heat-treated flour to cool completely before mixing to avoid clumping.
- Keep It Clean: Use a clean fork for each brownie bite to maintain the chocolate coating’s smoothness.
- Fun Add-Ins: Consider adding nuts, dried fruit, or even crushed cookies into the batter for added texture and flavor.
Common Mistakes and Troubleshooting
If you encounter issues while making your brownie bites, here are some common mistakes to watch out for:
- Overmixing the Batter: This can lead to tough bites. Mix only until combined.
- Too Wet or Dry Dough: Adjust with heat-treated flour or cream as needed to get the right consistency.
- Chocolate Not Melting Smoothly: Stir well in between heating intervals to ensure even melting and prevent burning.
- Chocolates Not Coating Properly: If the chocolate is too thick, thin it with a little more coconut oil.
- Storing Incorrectly: Store in an airtight container in the fridge to keep them fresh longer.
Variations to Try
Want to switch things up? Here are some tasty variations you can experiment with:
- Peanut Butter Brownie Bites: Replace half of the butter with creamy peanut butter for a nutty twist.
- Mint Chocolate Brownie Bites: Add peppermint extract to the batter for a refreshing minty flavor.
- Nutty Brownie Bites: Incorporate chopped walnuts or pecans into the batter for added crunch.
- Chocolate Chip Cookie Brownie Bites: Layer a cookie dough layer on top of the brownie batter before chilling for a delicious two-in-one treat.
Storage and Make-Ahead Instructions
These brownie bites are perfect for make-ahead treats! Here’s how to store them:
- Refrigerator: Store in an airtight container in the fridge for 3-4 days. Enjoy them chilled for the best texture!
- Freezer: For longer storage, freeze the uncoated brownie bites. When ready to enjoy, thaw in the fridge and coat with chocolate before serving.
- Make Ahead: You can prepare the mixture up to a day in advance, just roll into balls and chill before dipping.
Frequently Asked Questions
Got questions? Here are some common inquiries about these no-bake brownie bites:
- Can I use whole wheat flour instead of all-purpose? Yes, but it may change the texture slightly. Be sure to heat treat it first.
- How do I know if the flour is heat-treated correctly? Use a food thermometer to ensure it reaches 165°F.
- What can I use instead of heavy cream? Coconut cream or a non-dairy alternative will work well.
- Can I add more chocolate chips? Absolutely! Feel free to double the mini chocolate chips for an extra chocolatey bite.
- Are these brownie bites gluten-free? Yes, if you use gluten-free flour, these bites can be made gluten-free!
- How long do these last in the fridge? They can last up to 4 days if stored properly in an airtight container.
- Can I substitute the sugars? Yes, you can use coconut sugar, but it may alter the flavor slightly.
- What if my mixture is too crumbly? Add a bit more heavy cream to moisten it until it holds together.
Nutrition Tips and Dietary Adaptations
These brownie bites can be made to suit various dietary needs:
- Vegan: Substitute butter with coconut oil and heavy cream with coconut cream.
- Gluten-Free: Use certified gluten-free flour to ensure safety.
- Lower Sugar: Reduce the sugar content or use a sugar substitute.
- Nut-Free: Ensure your chocolate chips are nut-free and avoid adding nuts to the recipe.
Equipment Recommendations
Here’s a quick list of tools that will make your brownie bite-making process seamless:
- Mixing Bowls: A medium bowl for combining dry ingredients and a microwave-safe bowl for melting chocolate.
- Measuring Spoons: Essential for accurate ingredient measurements.
- Spatula: For folding in ingredients gently without overmixing.
- Microwave or Oven: Needed for heat-treating the flour.
- Parchment Paper: To line your baking sheet for easy cleanup.
Serving Suggestions
Serve your no bake brownie bites in a variety of ways:
- On a Platter: Arrange them on a serving platter for a beautiful presentation at parties.
- With Dipping Sauces: Serve alongside caramel or chocolate sauce for a fun dipping experience.
- Garnished: Top with a sprinkle of sea salt or dusting of powdered sugar for an elegant touch.
- In a Dessert Bar: Include them in a dessert bar with other treats like cookies and bars for variety.
With these decadent no bake brownie bites, you can indulge in a delicious treat without the hassle of baking. Whether you’re making them for a special occasion or simply to satisfy your sweet tooth, this recipe is sure to become a favorite in your kitchen. Enjoy every fudgy bite and feel free to experiment with flavors and add-ins!
No Bake Brownie Bites
Ingredients
Dry Ingredients
- 1 cup all-purpose flour (heat treated (see note 1))
- 0.25 cup Dutch process cocoa powder (see note 2)
- 0.5 teaspoon salt
- 1 cup semi-sweet chocolate chips
- 6 tablespoons unsalted butter
- 0.5 cup granulated sugar
- 0.75 cup light brown sugar
- 0.25 cup heavy cream
- 1 teaspoon vanilla extract
- 0.5 cup mini chocolate chips
Additional Chocolate Coating
- 2 cups milk chocolate chips or semi-sweet or dark (see note 3)
- 2 teaspoons coconut oil or shortening
Instructions
- Heat treat the flour by microwaving or oven, then cool completely. Mix cooled flour, cocoa powder, and salt in a bowl.
- Melt chocolate chips and butter in 30-second microwave bursts, stirring until smooth. Beat with sugars, heavy cream, and vanilla until smooth and light.
- Add dry ingredients to wet, mix until just combined, then fold in mini chocolate chips. Adjust dough consistency with additional flour or cream if needed.
- Portion batter into 1-tablespoon balls, chill for 15 minutes. Melt chocolate coating with coconut oil, then dip each ball to coat.
- Set coated truffles at room temperature until firm. Enjoy immediately or store for up to 3-4 days.