Effortless Lemon Oat Bars: A Bright Snack for Any Occasion
Discover the perfect combination of wholesome ingredients and zesty flavor with these Easy Lemon Oat Bars. In just a few simple steps, you can whip up a delicious treat that’s not only satisfying but also nutritious. These bars are ideal for a quick snack or a delightful dessert, making them a versatile addition to your recipe repertoire.
Why You’ll Love This Recipe
These Lemon Oat Bars are a fantastic treat for many reasons:
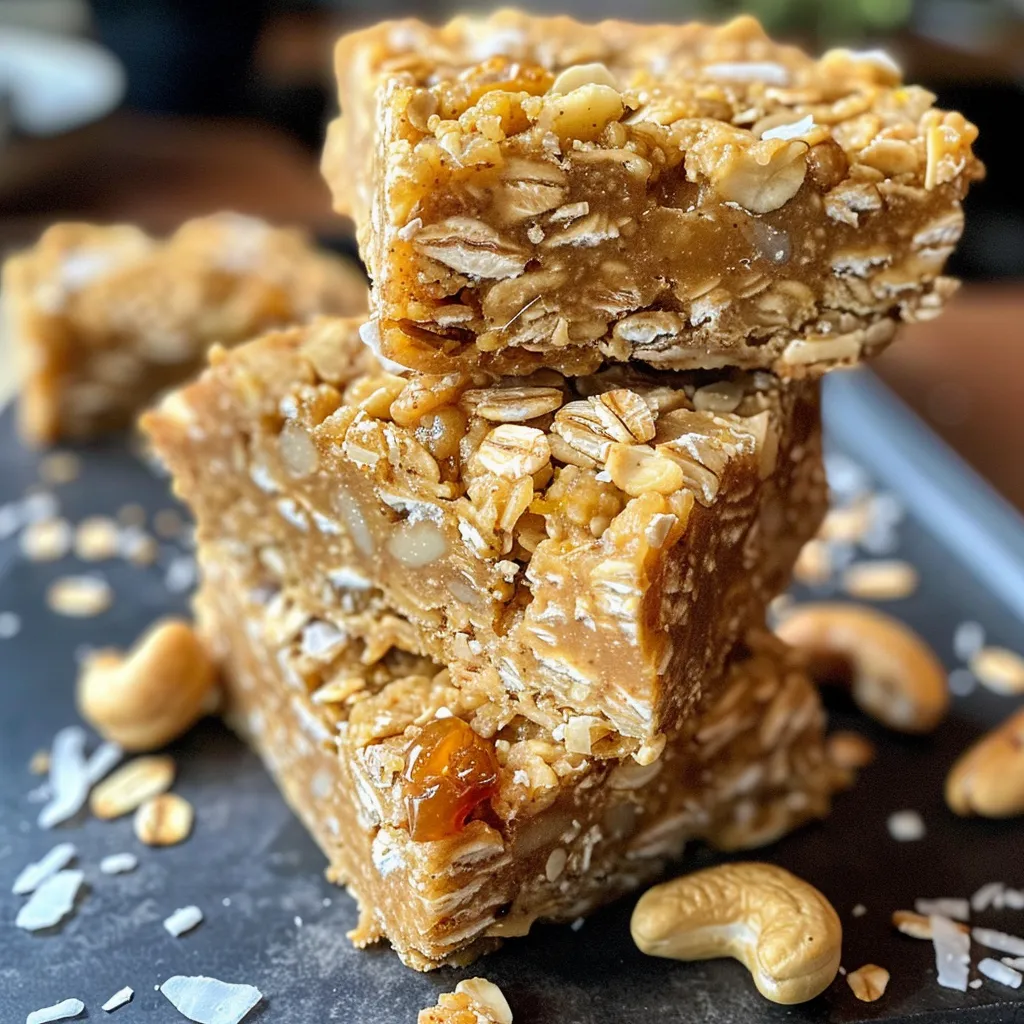
- Nutritious Ingredients: Packed with rolled oats, cashews, and fresh lemon, these bars provide essential nutrients and a burst of flavor.
- Quick and Easy: With a prep time of just 10 minutes and a baking time of only 10 minutes, you can enjoy these bars in no time.
- Customizable: Easily adapt the recipe with different nuts or fruits based on your preferences.
- Vegan-Friendly: This recipe contains no animal products, making it suitable for vegan diets.
- Perfect for Meal Prep: These bars store well, making them a great option for meal prepping your snacks for the week.
Ingredient Breakdown
To make these delicious Lemon Oat Bars, you’ll need the following ingredients:
- 1 cup rolled oats (100g): Choose gluten-free oats if needed.
- 1 cup cashews (140g): For a creamy texture and nutty flavor.
- 1 cup desiccated coconut (85g): Adds sweetness and chewiness.
- 1.5 cups soft medjool dates (225g): Acts as a natural sweetener and binder.
- Zest and juice of a large lemon: Provides that refreshing lemon flavor.
- Pinch of sea salt (optional): Enhances the flavors of the other ingredients.
Feel free to substitute cashews with almonds or pecans for a different flavor profile. If you need a nut-free option, consider using sunflower seeds instead.
How to Make Lemon Oat Bars
Follow these straightforward steps to create your Lemon Oat Bars:
- Preheat the oven: Set your oven to 180°C (350°F).
- Prepare the mixture: Pit the dates and add them to a food processor along with all the other ingredients. Blend until the mixture is well combined and sticky.
- Shape the bars: Divide the mixture into 12 equal pieces. Press them down into a greased and lined brownie or cupcake tin.
- Bake: Sprinkle some extra nuts or coconut on top, if desired, and bake for 10 minutes.
- Cool and serve: Allow the bars to cool and harden before cutting them into squares.
Pro Tips for Perfect Bars
Enhance your baking experience with these expert tips:
- Use fresh ingredients: Fresh lemon juice and zest will provide the brightest flavor.
- Don’t over-blend: Stop blending as soon as the mixture is sticky to maintain texture.
- Adjust sweetness: Taste the mixture before baking and add more dates if you prefer sweeter bars.
- Even baking: Spread the mixture evenly in the tin to ensure uniform baking.
- Cool completely: Allow the bars to cool fully for the best texture.
- Customize flavors: Experiment with spices like cinnamon or vanilla extract for added depth.
- Check for doneness: Bars should be slightly golden on the edges when done.
- Cut with a sharp knife: This will help create clean edges when slicing your bars.
Common Mistakes and Troubleshooting
Avoid these common pitfalls when making your Lemon Oat Bars:
- Too crumbly: This can happen if the mixture is not sticky enough. Add a few more dates to help bind it together.
- Overbaking: Monitor your bars closely to prevent them from drying out.
- Not enough lemon flavor: Ensure you’re using fresh lemon juice and zest for maximum flavor.
- Bars falling apart: Make sure to press the mixture firmly into the tin before baking.
Variations to Try
Get creative with your Lemon Oat Bars by trying these variations:
- Chocolate Chip Lemon Bars: Add dark chocolate chips to the mixture for a rich contrast.
- Berry Lemon Bars: Incorporate dried cranberries or blueberries for a fruity twist.
- Nut-Free Version: Replace cashews with sunflower seeds and increase the amount of oats.
- Coconut Lemon Bars: Increase the desiccated coconut for a tropical vibe.
Storage and Make-Ahead Instructions
Store your Lemon Oat Bars for optimal freshness:
- In the fridge: Keep bars in an airtight container for up to one week.
- In the freezer: Freeze for up to three months. Wrap individual bars in parchment paper for easy access.
- Make-ahead: Prepare the mixture and shape it into bars, then bake them when you’re ready to enjoy.
FAQ: Your Lemon Oat Bars Questions Answered
Here are some frequently asked questions about making Lemon Oat Bars:
- Can I use quick oats instead of rolled oats? Quick oats may work, but rolled oats provide better texture.
- Are these bars gluten-free? Yes, if you use gluten-free oats, these bars are gluten-free.
- Can I make these bars nut-free? Yes, substitute cashews with seeds like sunflower or pumpkin seeds.
- How do I know when they are done baking? They should be slightly golden on the edges and firm to the touch.
- Can I add protein powder? Yes, adding a scoop of protein powder can make these bars a great post-workout snack.
- What can I use instead of medjool dates? You can try using dried apricots or figs, but the texture may vary.
- Are these bars suitable for kids? Absolutely! They are a healthy snack option for children.
- Can I eat them warm? Yes, but they will be softer. Let them cool for the best texture.
Nutrition Tips and Dietary Adaptations
Enhance the nutritional value of your Lemon Oat Bars with these tips:
- Add seeds: Incorporate chia or flax seeds for added fiber and omega-3 fatty acids.
- Use natural sweeteners: Consider using maple syrup or honey for a different sweetness profile.
- Boost protein: Add nut butter to the mixture for a protein boost.
- Reduce sugar: Cut back on dates or use unsweetened coconut to lower sugar content.
Essential Equipment for Making Lemon Oat Bars
Having the right tools can make your baking process smoother:
- Food processor: Essential for blending the ingredients smoothly.
- Brownie or cupcake tin: To shape and bake your bars.
- Spatula: Helps to evenly spread the mixture in the tin.
- Measuring cups and spoons: Accurate measurements are key to perfect results.
Serving Suggestions
Enjoy your Lemon Oat Bars in various ways:
- With a cup of tea: Perfect for an afternoon snack.
- As a breakfast option: Pair with yogurt and fresh fruit for a balanced meal.
- Crumbled over ice cream: Add a crunchy topping to your favorite dessert.
- Pack for lunch: A great portable snack for school or work.
Conclusion
These Lemon Oat Bars are not just a treat; they are a delightful way to incorporate wholesome ingredients into your diet while enjoying a burst of citrus flavor. With their quick preparation and versatility, they are bound to become a staple in your kitchen. Whether you are enjoying them at home or on the go, you’ll find that these bars are a smart, efficient, and delicious option for any time of day. So why wait? Gather your ingredients and start baking today!
Easy Lemon Oat Bars
Ingredients
dry ingredients
- 1 cup rolled oats (GF if needed)
- 1 cup cashews
- 1 cup desiccated coconut
- 1.5 cups soft medjool dates
fresh ingredients
- 1 large lemon (zest and juice)
- pinch sea salt sea salt (optional)
Instructions
- Preheat oven to 180C/350F.
- Pit dates and blend with oats, cashews, coconut, lemon zest, juice, and salt until sticky.
- Divide mixture into 12 pieces and press into a greased lined tin.
- Sprinkle with extra nuts or coconut, if desired, then bake for 10 minutes.
- Allow to cool and set before cutting into bars.