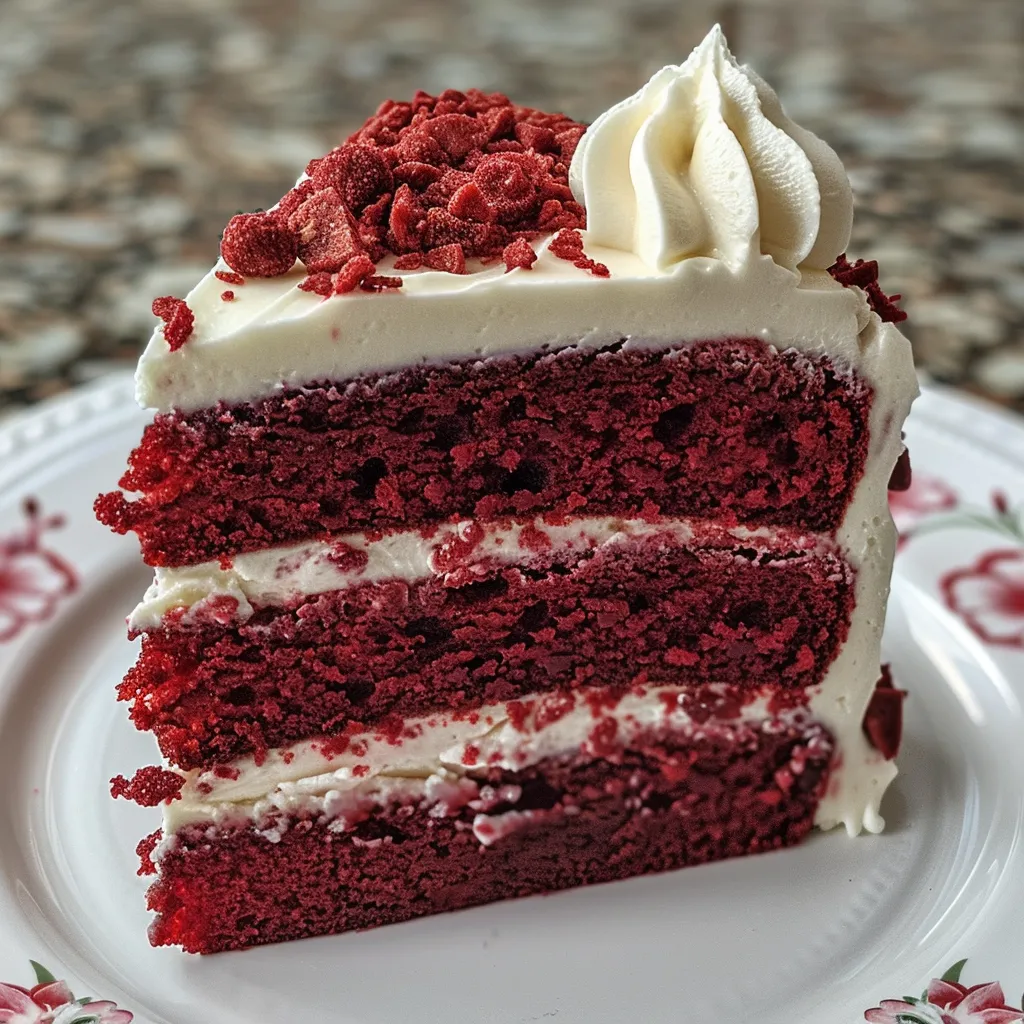
Unveiling the Magic of Red Velvet Cake
Welcome to the ultimate guide on crafting the perfect red velvet cake. This classic dessert not only boasts a stunning appearance but also offers a delightful blend of flavors that make it a favorite for celebrations and everyday indulgences alike. In this comprehensive article, we will take you through every step of the process, from selecting ingredients to mastering the baking technique. With our easy-to-follow instructions, you’ll create a show-stopping cake that will impress friends and family, all while enjoying the journey of baking.
Why You’ll Love This Recipe
- Effortless Baking: This recipe simplifies the process, ensuring you can achieve a moist and flavorful cake without the usual complexities involved in baking.
- Rich Flavor Profile: The combination of cocoa powder and buttermilk creates a unique flavor that is both rich and tangy, setting this cake apart from typical chocolate cakes.
- Stunning Presentation: The vibrant red color makes this cake a visual feast, perfect for special occasions like birthdays, anniversaries, or holiday gatherings.
- Versatile Frosting Options: Pair this cake with a classic cream cheese frosting or explore other delicious frostings that complement the red velvet flavor beautifully.
- Make-Ahead Friendly: This cake can be prepared in advance and stored, making it ideal for busy schedules or event planning.
Understanding the Key Ingredients
Before diving into the recipe, let’s break down the essential ingredients that contribute to the magic of red velvet cake. Each plays a vital role in achieving the perfect texture and flavor.
- Cocoa Powder: It provides a subtle chocolate flavor and rich color. Opt for high-quality, unsweetened cocoa powder for the best results.
- Buttermilk: This ingredient adds moisture and a slight tanginess, crucial for the cake’s unique flavor profile. If you don’t have buttermilk, you can easily make a substitute by mixing milk with a splash of vinegar.
- Vanilla Extract: A must-have for enhancing the overall flavor, elevating the cake beyond just the chocolate notes.
- Sugar: It not only sweetens but also contributes to the cake’s moist texture.
- Butter: Using unsalted butter allows better control over the cake’s saltiness and adds richness. Ensure it’s at room temperature for easier mixing.
- Eggs: They act as a binder and leavening agent, helping the cake rise and maintain its structure.
- Flour: All-purpose flour is typically used, but cake flour can also be substituted for a lighter texture.
- Salt: A necessary component to balance sweetness and enhance flavors.
- Red Food Coloring: This iconic ingredient is what gives red velvet cake its signature hue. Use gel food coloring for a more vibrant color without altering the cake’s consistency.
- Cream Cheese: The star of the frosting, offering a creamy, tangy contrast to the cake’s sweetness.
- Powdered Sugar: Essential for achieving a smooth and sweet frosting.
Step-by-Step Instructions for the Perfect Red Velvet Cake
Now that we’ve covered the ingredients, let’s dive into the step-by-step process of making your red velvet cake.
- Preheat Your Oven: Start by preheating your oven to 350°F (175°C). This ensures even baking.
- Prepare Your Pans: Grease your cake pans with unsalted butter or cooking spray, then line the bottoms with parchment paper for easy removal.
- Dust with Flour: Lightly dust the sides of the pans with flour and shake off any excess to prevent sticking.
- Mix Sugar and Butter: In a large mixing bowl, beat together sugar and butter until fluffy, about 3-4 minutes.
- Add Eggs: Incorporate the eggs one at a time, mixing well after each addition to ensure they are fully combined.
- Combine Dry Ingredients: In a separate bowl, whisk together your dry ingredients: flour, cocoa powder, and salt.
- Mix Wet Ingredients: In another bowl, combine buttermilk, vanilla extract, and red food coloring, stirring until well blended.
- Combine Mixtures: Gradually add the dry ingredients to the sugar mixture, alternating with the wet ingredients. Start and end with the dry ingredients, mixing until just combined to avoid overmixing.
- Prepare to Bake: Pour the batter evenly into the prepared pans and smooth the tops for even baking.
- Bake the Cake: Bake in the preheated oven for about 25-30 minutes, or until a toothpick inserted into the center comes out clean.
- Cool the Cakes: Allow the cakes to cool in the pans for 10 minutes, then turn them out onto wire racks to cool completely.
Frosting Your Cake: Cream Cheese Delight
While your cakes are cooling, let’s prepare the cream cheese frosting that will perfectly complement your red velvet layers.
- Beat the Cream Cheese and Butter: In a medium bowl, combine cream cheese and unsalted butter, beating until smooth and creamy.
- Gradually Add Powdered Sugar: Slowly add powdered sugar while mixing on low speed, increasing to medium once incorporated to avoid a sugar cloud.
- Add Vanilla: Mix in vanilla extract for an extra layer of flavor.
- Frost the Cake: Once the cakes are completely cooled, place one layer on a serving plate, spread a generous amount of frosting on top, and layer the second cake. Frost the top and sides of the cake, smoothing it out with a spatula.
- Chill Before Serving: For the best results, chill the frosted cake in the refrigerator for at least 30 minutes before serving. This helps the frosting set and makes cutting easier.
Pro Tips for Baking Success
To ensure your red velvet cake turns out perfectly, consider these expert tips:
- Room Temperature Ingredients: Ensure your butter, eggs, and cream cheese are at room temperature for a smoother batter and frosting.
- Don’t Overmix: Mix your batter just until combined to prevent a dense cake.
- Check for Doneness: Perform the toothpick test in the center of the cake to check for doneness; it should come out clean or with a few moist crumbs.
- Flavor Variations: Experiment with different extracts like almond or lemon to add unique flavors to your frosting.
- Layering Technique: For a more decorative finish, use a cake scraper to create a smooth frosting layer.
- Decorative Toppings: Consider adding sprinkles, crushed nuts, or edible flowers on top for an extra touch.
- Store Properly: Keep your cake in an airtight container in the refrigerator to maintain freshness.
- Use Quality Ingredients: High-quality cocoa powder and food coloring can significantly impact the taste and appearance of your cake.
- Test Your Oven: Ensure your oven temperature is accurate, as discrepancies can lead to uneven baking.
- Review Common Mistakes: Familiarize yourself with typical pitfalls, like underbaking or using cold ingredients, to avoid them on baking day.
Common Mistakes and Troubleshooting
Even experienced bakers can encounter issues when making a red velvet cake. Here’s how to troubleshoot some common problems:
- Dry Cake: If your cake turns out dry, it could be due to overbaking. Ensure you check for doneness a few minutes before the recommended baking time.
- Dense Texture: Overmixing the batter can lead to a dense cake. Mix just until combined.
- Uneven Layers: If your layers are uneven, ensure your oven is level and that you’re using the same amount of batter for each pan.
- Frosting Issues: If your cream cheese frosting is too runny, add more powdered sugar until you achieve the desired consistency.
- Color Variations: If your cake isn’t as red as you’d like, make sure you’re using gel food coloring and not liquid, as it can dilute the batter.
Delicious Variations to Try
While the classic red velvet cake is a delight on its own, here are some variations to keep things exciting:
- Red Velvet Cupcakes: Transform your cake batter into cupcakes for individual servings. Adjust the baking time to 18-20 minutes.
- Red Velvet Layer Cake: Stack multiple layers with cream cheese frosting and fresh fruit for a stunning centerpiece.
- Chocolate Chip Red Velvet Cake: Fold in mini chocolate chips into the batter for added texture and sweetness.
- Red Velvet Trifle: Layer cake pieces with cream cheese frosting and berries in a glass for a beautiful presentation.
Storage and Make-Ahead Instructions
Your red velvet cake can be made ahead of time and stored properly for later enjoyment. Here’s how:
- Room Temperature: The frosted cake can be stored at room temperature for up to two days, covered loosely with foil.
- Refrigeration: Store in the refrigerator for up to a week. Make sure it’s in an airtight container to prevent drying out.
- Freezing: You can freeze the unfrosted layers for up to three months. Wrap each layer tightly in plastic wrap, then foil. Thaw completely before frosting.
Frequently Asked Questions (FAQs)
To further assist you in your baking journey, here are some common questions answered:
- Can I use regular milk instead of buttermilk? Yes, but you should add 1 tablespoon of vinegar or lemon juice to one cup of milk and let it sit for 5-10 minutes to sour.
- What if I don’t have red food coloring? You can use beet juice as a natural alternative, but it may alter the flavor slightly.
- How can I make my cake more chocolatey? Increase the cocoa powder by an additional tablespoon for a richer chocolate flavor.
- Can I make this cake gluten-free? Yes, substitute all-purpose flour with a gluten-free blend designed for baking.
- How do I know when my cake is done? Use a toothpick inserted in the center; it should come out clean or with a few moist crumbs.
- Can I use oil instead of butter? Yes, but it may change the texture slightly. Use a neutral oil for best results.
- How long can I store leftover cake? Leftover cake can be stored in the fridge for up to a week, or frozen for three months.
- What is the best way to frost a cake? Start with a crumb coat to seal in crumbs, then apply a thicker layer of frosting for a smooth finish.
Nutritional Tips and Dietary Adaptations
If you’re looking to make dietary adjustments, here are some tips:
- Lower Sugar Options: Substitute granulated sugar with coconut sugar or a sugar alternative to reduce calories.
- Vegan Version: Replace eggs with flax eggs and use a plant-based butter and cream cheese substitute.
- Dairy-Free Option: Use almond milk or coconut milk in place of buttermilk and dairy-based frosting.
- Healthier Frosting: Consider using Greek yogurt mixed with cream cheese for a lighter frosting alternative.
Essential Equipment for Success
Having the right tools can make your baking experience smoother:
- Mixing Bowls: A set of mixing bowls in various sizes will help you manage your ingredients easily.
- Electric Mixer: A stand or hand mixer will speed up the process of creaming butter and sugar.
- Cake Pans: Use 9-inch round cake pans for even layers; consider using non-stick pans for easy release.
- Spatula: A good offset spatula is essential for spreading frosting evenly.
- Wire Rack: A cooling rack is vital for ensuring your cakes cool evenly and don’t become soggy.
Serving Suggestions
When it comes to serving your red velvet cake, consider these ideas to elevate the experience:
- Accompany with Fresh Berries: Fresh strawberries or raspberries add a burst of flavor and color.
- Pair with Ice Cream: A scoop of vanilla or cream cheese ice cream complements the cake beautifully.
- Garnish with Nuts: Chopped pecans or walnuts can add a delightful crunch and contrast to the soft cake.
Conclusion: Your Perfect Red Velvet Cake Awaits
Now that you have all the tools and knowledge to create a stunning red velvet cake, it’s time to roll up your sleeves and get baking. Remember, practice makes perfect, and with each attempt, you’ll refine your technique and flavor. Enjoy the process, share your creations, and most importantly, savor every delicious bite. Happy baking!
Easy Homemade Red Velvet Cake
Ingredients
Dry Ingredients
- 0.75 cup Cocoa Powder
- 2.5 cups Flour
- 1.5 teaspoons Salt
Wet Ingredients
- 1.75 cups Buttermilk
- 1.5 teaspoons Vanilla Extract
- 2 tablespoons Red Food Coloring
Cake Batter
- 1 cup Sugar
- 0.5 cup Butter
- 2 eggs Eggs
- 1.5 cups FLOUR
Cream Cheese Frosting
- 8 oz Cream Cheese
- 0.5 cup Unsalted Butter
- 2 cups Powdered Sugar
Instructions
- Preheat oven to 350°F (175°C). Grease pans and dust with flour.
- Mix sugar and butter until fluffy, then add eggs one at a time.
- Combine dry ingredients and wet ingredients separately, then alternate adding to the batter.
- Pour batter into pans and bake for 30 minutes. Cool before frosting.
- Mix cream cheese and butter, then add powdered sugar and vanilla. Frost the cake.