Indulge in the Delight of Mini Black Forest Layer Cakes
Welcome to your new favorite dessert: the mini black forest layer cakes. These delightful treats offer a perfect blend of rich chocolate sponge, luscious cherry filling, and fluffy whipped cream, making them a showstopper for any occasion. Whether you’re celebrating a birthday, an anniversary, or simply treating yourself, these mini cakes are sure to impress. In this guide, we’ll explore everything you need to know to create these stunning desserts that are not only delicious but also easy to make.
Why You’ll Love This Recipe
This recipe isn’t just about baking; it’s about creating an experience. Here are five compelling reasons to dive into making these mini black forest layer cakes:
- Portion Control: These cakes are perfectly sized to satisfy your sweet tooth without overindulging.
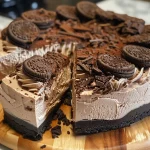
- Visual Appeal: Their petite size and beautiful presentation make them a stunning centerpiece for any dessert table.
- Easy to Customize: You can easily modify the flavors or toppings to suit your taste or dietary needs.
- Quick to Assemble: The straightforward steps allow for a stress-free baking experience, even for beginners.
- Perfect for Sharing: Ideal for parties or gatherings, these mini cakes are a delightful way to share sweetness with others.
Ingredients for Mini Black Forest Layer Cakes
Here’s what you’ll need to create these flavorful mini cakes:
- 1 cup all-purpose flour: The base for your cake that gives it structure.
- ½ cup unsweetened cocoa powder: Essential for that rich chocolate flavor.
- 1 cup sugar: Sweetens the batter and balances the flavors.
- ½ tsp baking powder: Helps the cakes rise.
- ½ tsp baking soda: Works with the baking powder for a fluffy texture.
- ¼ tsp salt: Enhances flavor and balances sweetness.
- 1 large egg: Provides moisture and richness.
- ½ cup milk: Adds moisture to the batter.
- ½ cup hot coffee (or hot water): Enhances the chocolate flavor and helps to create a moist cake.
- ⅓ cup vegetable oil: Keeps the cake tender and moist.
- 1 tsp vanilla extract: Adds depth to the flavor.
- 1 ½ cups cherry pie filling or homemade: The fruity layer that gives the black forest its name.
- Optional: 1–2 tbsp Kirsch: A traditional cherry brandy for added flavor.
- 1 ½ cups cold heavy cream: For the luscious whipped topping.
- ¼ cup powdered sugar: Sweetens the whipped cream.
- 1 tsp vanilla extract: To flavor the whipped cream.
- Optional: 2 tbsp cream cheese for stability: Helps the whipped cream hold its shape.
- Fresh cherries (with stems): For the perfect decorative touch.
- Chocolate shavings or curls: For an elegant finish.
How to Make Mini Black Forest Layer Cakes

Follow these steps to create your mini masterpieces:
- Preheat and Prepare: Preheat your oven to 175°C (350°F) and prepare a sheet pan or two round cake tins lined with parchment paper.
- Mix Dry Ingredients: In a mixing bowl, whisk together the flour, cocoa powder, sugar, baking powder, baking soda, and salt until well combined.
- Combine Wet Ingredients: Add in the egg, milk, oil, and vanilla extract. Mix until the batter is smooth.
- Incorporate Hot Coffee: Gradually pour in the hot coffee, mixing gently. The batter will be thin, which is perfect for a moist cake.
- Bake the Cakes: Spread the batter evenly in your prepared pan and bake for 12–15 minutes, or until a toothpick inserted comes out clean. Allow to cool completely.
- Cut Out Cake Circles: Once cooled, use a 2.5–3 inch round cutter to cut out 12 small circles. Each cake will require 2 circles (or 3 for extra height).
- Prepare the Whipped Cream: In a mixing bowl, beat the heavy cream, powdered sugar, and vanilla extract until stiff peaks form. You can add cream cheese if you want a sturdier whipped cream.
- Assemble the Cakes: Place one chocolate circle at the bottom, pipe or spoon a thick layer of whipped cream, and add cherry filling. Top with the second sponge circle. Pipe more whipped cream on top, sprinkle with chocolate shavings, and place 3–4 fresh cherries on top.
Expert Tips for Success
To ensure your mini black forest cakes turn out perfectly, consider these expert insights:
- Cool Completely: Always let the cakes cool completely before assembling to prevent the whipped cream from melting.
- Use High-Quality Ingredients: For the best flavor, use high-quality cocoa powder, real cherries, and fresh cream.
- Stability in Whipped Cream: Adding cream cheese to the whipped cream will help maintain its shape for longer.
- Chill Your Tools: Chill the mixing bowl and beaters before whipping the cream to achieve better volume.
- Experiment with Flavors: Feel free to add a splash of different liqueurs or flavor extracts to the whipped cream for a unique twist.
- Make Ahead: These cakes can be made a day in advance; just store them in an airtight container in the fridge.
- Mind the Moisture: If your cakes are slightly dry, brush them with a little cherry juice or syrup before assembling.
- Serve Chilled: These mini cakes are best served chilled, enhancing their refreshing taste.
Common Mistakes and Troubleshooting
Even the best bakers can make mistakes. Here’s how to troubleshoot:
- Cakes are Too Dry: Ensure you’re measuring flour correctly and not overbaking your cakes.
- Whipped Cream is Runny: This could be due to under-whipping or using warm cream; make sure to chill everything.
- Cakes Fall Apart When Assembling: This may happen if the cakes are too warm; always let them cool completely.
Variations on Mini Black Forest Layer Cakes
Looking to mix things up? Here are four delightful variations:
- Nutty Addition: Incorporate chopped nuts like walnuts or hazelnuts into the cake batter for added crunch.
- Fruit Layers: Swap the cherry filling for other fruits like raspberries or strawberries for a fresh twist.
- Chocolate Ganache Filling: Replace the cherry filling with a rich chocolate ganache for a double chocolate experience.
- Vegan Option: Substitute egg with flaxseed meal and use plant-based milk and cream for a vegan-friendly version.
Storage and Make-Ahead Instructions
To keep your mini black forest layer cakes fresh:
- Refrigerate: Store in an airtight container in the refrigerator for up to 5 days.
- Freezing: You can freeze the baked sponge layers for up to 2 months. Assemble them with cream once defrosted.
- Make Ahead: The cakes can be prepared a day in advance; just add the whipped cream right before serving to ensure freshness.
FAQs About Mini Black Forest Layer Cakes
Here are some common questions and answers to help you:
- Can I use different fruits?: Absolutely! Feel free to experiment with other fruit fillings.
- What is Kirsch?: Kirsch is a cherry brandy, traditionally used in black forest cakes; it adds a rich flavor.
- Can I make these gluten-free?: Yes, you can substitute all-purpose flour with a gluten-free blend.
- How do I make whipped cream stable?: Adding a bit of cream cheese or gelatin can help stabilize whipped cream.
- What’s the best way to slice the cakes?: Use a sharp knife and wipe it clean between cuts for neat slices.
- Can I use store-bought whipped cream?: Certainly, but homemade whipped cream offers better flavor and texture.
- How far in advance can I make these?: The sponge can be made 1-2 days ahead, but assemble just before serving for the best texture.
- What should I serve with these cakes?: Consider pairing with a scoop of vanilla ice cream or a drizzle of chocolate sauce.
Nutrition Tips and Dietary Adaptations
To make your mini black forest cakes more nutritious:
- Reduce Sugar: You can cut down on sugar without compromising taste by using less or opting for natural sweeteners.
- Whole Wheat Flour: Substitute part of the all-purpose flour with whole wheat flour for added fiber.
- Lower Fat Options: Use low-fat milk and light cream for a lighter version of the whipped topping.
Recommended Equipment
Equip yourself with these essentials to make the process smoother:
- Mixing Bowls: A set of mixing bowls in various sizes will help with ingredient prep.
- Electric Mixer: An electric mixer makes beating the whipped cream effortless.
- Round Cake Cutter: A round cutter helps achieve uniform cake layers.
- Spatula: A good spatula is essential for spreading the batter and whipped cream.
Serving Suggestions
Enhance your mini black forest layer cakes with these serving ideas:
- Chill before serving: These cakes are best enjoyed cold, so keep them in the fridge until just before serving.
- Garnish: Top with extra chocolate shavings and fresh cherries for an elegant touch.
- Pair with beverages: Serve alongside coffee, tea, or a dessert wine to enhance the flavors.
Final Thoughts
Creating mini black forest layer cakes is a delightful adventure that combines flavors and visual appeal, making them a favorite among dessert lovers. With this comprehensive guide, you’re fully equipped to bake and enjoy these charming treats in your home. Remember, the joy of baking lies not just in the finished product but in the process itself. Happy baking!
Mini Black Forest Layer Cakes: A Delightful Recipe!
Ingredients
Batter
- 1 cup all-purpose flour
- ½ cup unsweetened cocoa powder
- 1 cup sugar
- ½ tsp baking powder
- ½ tsp baking soda
- ¼ tsp salt
- 1 large egg
- ½ cup milk
- ½ cup hot coffee (or hot water)
- ⅓ cup vegetable oil
- 1 tsp vanilla extract
Filling & Topping
- 1 ½ cups cherry pie filling or homemade
- Optional: 1–2 tbsp Kirsch (traditional) (optional)
- 1 ½ cups cold heavy cream
- ¼ cup powdered sugar
- 1 tsp vanilla extract
- Optional: 2 tbsp cream cheese for stability (optional)
- Fresh cherries with stems for the perfect look
Instructions
- Preheat oven to 175°C (350°F). Prepare a pan or tins with parchment.
- Mix flour, cocoa, sugar, baking powder, baking soda, and salt. Add egg, milk, oil, vanilla; mix until smooth.
- Pour hot coffee into batter; bake for 12–15 minutes. Cool completely.
- Cut out 12 circles with a 2.5–3 inch cutter. Beat heavy cream, powdered sugar, vanilla, and optional cream cheese until stiff peaks form.
- Assemble cakes: place a chocolate circle, add whipped cream and cherry filling, top with another circle, more whipped cream, chocolate shavings, and cherries.